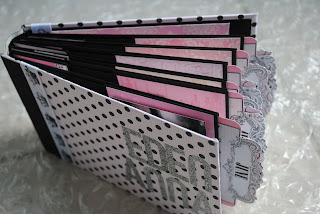
Tuesday, June 25, 2013

"Good Dog" Mini Album

So, Shiloh isn't always "good" but she takes such great care of us. She scares the beegeebees out of anyone who comes to the door; her version of keeping us safe. She is a constant companion and always wants to be where we are. She is so faithful. She wouldn't sleep in her bed in our room while Husband and I were in the hospital. I think she knew something was wrong because, even when he's late or out of town, she will sleep in there with me. I could go on and on but I won't. I'll just say that she's an awesome dog and we love her so very much.

First night at home and where she still sleeps today. 

This mini has been a LONG time coming. I found this paper, TPC Studio's Paws and Claws Dog, many moons ago at Tuesday morning (I think). I knew immediately that I wanted to make a "Shiloh" album.

Only later did I find the perfect chipboard album. It was meant to be a beehive but all I saw was a fire hydrant, and the perfect book coming together. You can watch the video HERE.


I traced the chipboard outline on my papers and cut them out by hand. Once I had adhered everything down, I roughed up the edges with a nail file and then inked all of them in Walnut Stain distress ink.

For the cover, I used my go to chipboard letters that I have had forever and have a TON of. Of course, when I go to spell out "good dog" in the orange, I have no options for all upper or all lower because I don't have a complete set in either. Oh well! I just mixed them up and then distressed them. :) I LOVE how the title turned out and that sweet touch of whimsy, just like our Shiloh.


For her picture, I cut five kraft circles from my circle punch with a patterned piece layered on top. I cut Shiloh's picture with my Stampin' Up 1 3/8 inch circle punch to mat it inside. Her tiara is punched from an old Martha Stewart punch I found on sale years ago. (I thought I would use it for the girls' minis but Shiloh got it first.) I did the same layering to bring some dimension and topped it with patterned paper. I applied Crackle Accents all over for more detail.

I wanted to add as many photos and as much journaling as I could to this mini album. On the first page, I popped up one of my favorite pictures of her and the journaling spot slides out from underneath. For even more journaling room, I folded the paper in half. The pull is punched and layered using my small and large Stampin' Up tag punches. I Crackle Accent-ed the paw on the patterned paper.

On the next page, I tried something I haven't done in a long time; I used a magnet closure. Forgot how fun and cool those are to use. Again, I slipped the journaling spot behind the matted photos.


*open*
 I made a pull out for five pictures and a journaling spot and tied with orange hemp cord. Used a mini lunch bag as a pocket to hold photos that I wanted to include but not display. A memo clip holds the sack shut. I matted a photo on the outside.


*Special heart jewel from Regan*
I created a pocket for photos and journaling from a longer photo that I backed on kraft cardstock. I popped up the photo on the next page and slipped more photos and a journaling spot underneath.


I fussy cut the dog house out of the papers and, after backing it on kraft cardstock, covered it with glossy accents. Once dry, I added the 'dog' brad that I had cut the prongs off of. The next page, I made a library pocket and matted with patterned paper. I popped it up and added even more pictures beneath.


The back is plain and simple. I added Shiloh's old tags with a trinket pin back here because they didn't look good on the front. I don't like it much so I'll be playing with other options.


That's my "Good Dog" mini album! Hope you enjoyed it.

I was able to create a kit out of my left overs. You can find that at my Zibbet shop by clicking the link to the right. :) You can also check out the video HERE.


Hope this finds you happy and healthy!

Friday, June 21, 2013

Pals Mini Album

I made this mini album from the Baby Saurus envelope kit by Little Yellow Bicycle. I have had it awhile because, when I bought it Archivers, I didn't notice that the chipboard covers were WAY too small for the envelopes. Realizing it was too late to return them to the store, I set the too-small covers to the side, made my own, and finished the mini. I made this for our cousin in Wisconsin that we visit every summer. Thought it would be fun to put pictures of his toys or him and his toys or him and friends (or us!) or really whatever. I didn't do a whole lot of embellishing (or really any embellishing) because I didn't want there to be little pieces possibly coming off and into little hands.


I did, however, paint and distress the letters for the title. Still not sure if I like them. First I covered them in a custom orange I mixed from acrylic paints. That was too bright and didn't match like I wanted in to. So I added brown paint with my finger in small swipes. They still needed something so I repeated the step with Antique Gold Rub'N'Buff. Wiped off as much as I could and there is the final product.


I also created the title layers with some left over Stampin' Up Simply Stampin' Kit (that I have no idea what the name was) scraps. Roughed them up a little by carefully crumpling and then smoothing out. I also only adhered them in the center so that the ends would stand up from the cover a bit. I punched five ovals from kraft cardstock, along with one from the scraps of design paper and glued them together, creating a little dimension.

I inked the hole reinforcers (came with the kit) with Shabby Shutters and Peeled Paint Distress Inks.


Thanks for stopping in! Hope this finds you happy and healthy.

Thursday, June 20, 2013

Glitter Ribbon Fun

So I was perusing the aisles of Tuesday Morning earlier today and I found the most beautiful glitter ribbon from American Crafts. The set has 15 rolls of different colored ribbon, four feet each. My pictures don't even begin to do the colors and sparkle justice.


Great neutrals and colors. I made this card with a rainbow mix of the ribbon.


Thanks for checking in! Hope this finds you happy and healthy!

Tuesday, June 18, 2013

End of Year School Gifts

I found this idea on Pinterest and another mommy helped me carry it out. I did the editing and coloring and she got the kids to thumbprint the tree. We had a small mishap the day we were going to give it to her (last day of school) and ended up having to cut it off at the bottom, hence the ribbon. The teacher's name and school info has been "X"ed out.

Sorry for the editing but it must be done :)
I found a "bare tree" clip art from the internet and printed it on white cardstock. Then I colored it with my Copic markers. The students used Stampin Up's Certainly Celery, Wild Wasabi, and Old Olive inks to create the leaves with their thumbprints. The print at the bottom is the teacher's name, school, grade, and year. The ribbon was not originally there but my friend had an accident and bled on the cardstock, so we had to do some surgery. Next time I will pay closer attention to the size of the tree as it was hard to fit the page into a standard frame and the kids' had to print their thumbs several times (which they didn't have an issue with :)).

I also made this bookmark for the teachers from me. It has a poem that goes along with those colored beads. This was my first attempt at bookmarks and can I just say "EASY"? Holy cow, they went together fast. My new go to gift.


I don't know where I originally got this ribbon; I've been hoarding it for awhile. I found this idea on Pinterest and knew that I wanted to try one myself. I found the ribbon clasps, which I have never used before, at Joanns, where I was actually looking for metal bookmarks. You know the ones that have the thin part that slip into the book and then the other side hangs out over the binding? No? This was also the first time using crimping beads. Man, is there a learning curve to those! Finally figured them out and I'm really happy with the outcome.

P brought some gifts to her little classmates as she will not be returning to her little preschool. We made a memory game and a note that said, "Thanks for the MEMORYs." These are really great for throwing in your purse and pulling out at appointments or waiting rooms. Time consuming project but worth it. A Pinterest find.


I ordered one inch wooden tiles from Michaels and needed twenty for each tin. The tins are the ones for wedding favors, found in the wedding aisle at Michaels; they have round and square. I punched all the papers, white for all the tiles and pairs of colors for the other side. I used plain white cardstock and all the colors are Stampin' Up. I modpodged the circles onto the tiles and then went over the whole thing again. Took lots of time but I think they will hold up well for some years.

Not pictured is the gift from the kids. A Michaels plastic paint can filled with M&M's and the poem I'm sure all of us has seen on Pinterest. But if not, you can see it HERE. (Pretty much the same as with the bookmark with some personal changes made.)  Also not pictured are the notecards I made E's teacher. Bummed about that; they were so cute!

Hope this finds you happy and healthy. :)

Sunday, June 16, 2013

Babies, Babies, Everywhere!

There have been an abundance of babies born (and those that will make their appearance soon) among my family and circle of friends. I am super excited for each and every one of them and decided to create a few minis to mark the occasion.

This first mini, I actually made two of. They are slightly different but basically the same and I love how they turned out. I used DCWV's Nana's Kids paper stack and kraft cardstock. Love the buttons brads and can't for the life of me figure out where I got them. Also the sleeves you see sticking out are baby onesies cut in coordinating cardstock. (Onesies diecuts can be found in my Zibbet Store.) Baby Boy mini album can be seen in its entirety HERE.


The third mini I created was for my cousin, who gave birth to her first on May 22nd. What a perfect excuse to break into the Teresa Collins Chic Bebe papers. :) The months are pullouts that she can note baby's growth monthly for the first year. There are lots of details that I just can't show in pictures so you can see Baby Girl mini album in its entirety HERE.


These are all made using Kathy Orta's Ultimate Brag Book Tutorial. I know, I'm a walking commercial for Kathy!

There are so many more to make and send! I don't know that I'll be able to get them all done. Maybe for their first birthdays?

Hope this finds you happy and healthy. :)


Friday, June 14, 2013

Hospital, shmospital.

You know you've been in the hospital too long when you come with nothing and leave with a cart.

So, on Saturday (the 8th), Husband started having severe abdominal pains. He thought he had had these types of pains before but when I found him curled into the fetal position on our bed, I started trying to convince him to let me take him to the ER. He resisted, so I started researching on the internet what this could possible be. I came up with gallbladder/gallstones. I couldn't find any information on what should be done about the pain, except on one site that said if you are experiencing abdominal pain and you don't know why you should seek medical treatment. I told him this and the look on my face must have convinced him to go. He wouldn't let me drive him but I was going to let him do anything he wanted if it got him to the hospital.

After he left, I continued my research on the web. I discovered that it could be his appendix, so I texted him right away with that info. Of course, his phone was already dangerously low on battery power. Later I found out that he told the ER doctor that "my wife thinks its either my gallbladder or appendix" in which she replied, "Gallbladder issues are in women or fat people and you are neither of those." So it was confirmed that his appendix needed to come out and they admitted him to the hospital.

(Sunday) I couldn't get there until the morning (when my mom came to take care of all the kids). He was in a lot of pain when I got there and asked for meds. Shortly, they wheeled him back and he had his appendectomy. The doctor came out to the surgical waiting room and told me everything looked good and I even got to see pictures, which I know Husband would never want to know even existed, queasy as he gets. After surgery he was very sore and it turns out that the carbon dioxide that they used to inflate his belly irritated his diaphragm, making it hard to inhale deeply. He wanted to wait on pain meds (as he likes to only take meds "when necessary") and ended up waiting too long. He started experiencing a lot of pain and when the nurse took his blood pressure (standard before giving heavy duty pain killers as they can lower BP even further) she found it sitting at 74/48. She called the "rapid response team", which is basically like a code blue without the heart attack. In about a minute there were people everywhere. They didn't seem too concerned, kind of talking to each other about what could be going on and have you tried this and what's his _____ ? and so on. They finally decided he was dehydrated and started pushing bags of iv fluids. And when I say pushing, I means squeezing the bag with all their might. The team slowly started leaving in singles and pairs until it was just the hospitalist, the head of nursing, and our nurse. His BP evened out and everyone left. Shortly after, our doctor showed up. He said that he didn't understand what was going yet as Husband was a young, healthy male, but that it could be just dehydration, body reacting to trauma, internal bleeding, or any combination of the above. We were just going to have to wait it out. So it was a rough night.

(Monday) The morning showed promise though. Husband felt like getting out of bed and walking and really seemed to be improving. He was even enjoying his clear liquid diet. His blood work kept showing drops in his hemoglobin, which all I know about that is it has to do with his blood. Normal is between 9 and 15, and by the time Husband's reached 6.0 on Tuesday morning the doctor said that's it, we're going back in. So, he went in looking for internal bleeding.

(Tuesday) The doctor didn't actually find an "active bleeder" but found two spots that were potentially the problem and a lot of clotted, old blood. He cleaned out the blood and tied off those two spots (just in case) and called it done. He was even able to go into the same holes as the appendectomy so there was no new trauma to Husband's belly. He did end up getting a total of four units of blood, two units during the surgery and two afterwards.

After this, it was slow going but he steadily made progress and after another two days we were released to go home Thursday night.

I hope this ordeal is over. We will see over the next few days but I really think that we are good, knock on wood.***

So that's been my week. Hope yours was better! I'm looking forward to a plain, uneventful weekend. :)

Hope this finds you happy and healthy.

***UPDATE 2013-06-20: Everyone is doing great. Husband returned to work on Monday and even though he seems more tired than usual, has had no other side effects. The kds are responding better to authority with both their parents back at home. It took some time getting back into a routine. Baby boy still will not go willing to my mom; I think he thinks I'm going to leave for another 5 days. My mom just now feels caught up on her sleep. :)

Monday, June 10, 2013

Meg's Mini Album

My BBF just graduated nursing school last month! Woot woot, for Megan! I am so very proud of her and I wanted to make her a mini album to keep all those special things that she has or will collect over her time as a nurse. We all need a happy place and hope that that is what I have created for her. I do remember from the work place, getting those random pictures and thinking, "I love it but where to keep/display it?" That was the job I was giving to this gift. Now, whatever she decides to do with it is completely okay with me but we've got to start with a plan, right?

I used My Mind's Eye (MME) The Sweetest Thing paper collection and the 'Lavender' papers and embellishments from within that collection. All edges are inked with Brushed Corduroy distress ink. I used Kathy Orta's Build-a-Page mini album. Love it! So many ways to customize. You can see the video HERE.


Couldn't be more proud of her. Hope this finds you happy and healthy.

(Thanks for letting me watch you go through this journey, Megan. I love you.)

Friday, June 7, 2013

Girls' Summer Mini - Before

It's our first official day of summer!! Woo-hoo!!

Let's start with the mini album I was inspired by; THANK YOU, Shelly at YT: Shelly Bailey. She created a summer mini for her daughter and made it even more fun by adding a jar full of summer fun to document. I loved the idea and went ahead, creating my own. Now mine is bigger than hers as I have three kiddos that need real estate in this book. But the idea is the same. This is the "before" post. The mini has just been bare bones waiting for the summer to begin. And today, it begins.


I used Kathy Orta's Retro-Fitted Mini Album tutorial. That is one talented lady!

We can't wait to fill this mini up with our summer adventures. I will be back with the "after" when school resumes. I'm sure it will fly by. :)

Hope this finds you happy and healthy.